
VPN Guard is our latest implementation designed to protect your internet security and privacy. In this post, we'll show you how to setup a DNSonly VPN to fully utilize all features of VPN Guard, including ads block provided by VPN Guard Advanced.
VPN Guard
VPN Guard uses DNS to protect your safety and privacy. It allows your device to send all DNS queries to your VPN server, which would prevent access to malicious websites and any website that you want to block.
So in the event of you accidentally clicking on a link to a phishing site, VPN Guard would stop the connection and you'll be safe.
Further more, VPN Guard Advanced is able to block the connections to servers for ads displaying. As a result, ads would not be shown on your device so that you could save battery and bandwidth for useful contents only.
VPN Guard has been enabled for all users, and VPN Guard Advanced could be activated if you're under a VPN Plus plan, or you could use a DNSonly VPN to get the benefits of VPN Guard Advanced if you're having a Basic plan.
DNSonly
DNSonly VPN is designed such that only DNS requests would be served and would be protected by VPN Guard functions.
You could use DNSonly VPN to resolve domain names, so that your web browser would know which server to connect to when you type in "www.google.com". However, connections to and from the website cannot go through a DNSonly VPN. It means that connections between your device and the server hosting www.google.com would have to bypass the DNSonly VPN server.
DNSonly VPN brings greater flexibility to you. If you do not need ads-blocking features, a regular personal VPN will just work for you. On the other hand, if you prefer to connect to the Internet directly while looking for ads-blocking features, you should try out our DNSonly VPN.
Of course, you could also simply upgrade to VPN Plus, and you'll be able to enable all VPN Guard features while encrypting all your Internet activities with secure VPN connections.
Type of VPN we're offering
\1. DNSonly VPN
It could block malwares and ads, but traffic between your device and the Internet will not be transmitted and it would have to bypass the DNSonly VPN.
\2. Regular personal VPN
This VPN is able to encrypt traffic with the Internet, but you could also decide not to encrypt the traffic and use it as a DNSonly VPN. However, only regular personal VPN under VPN Plus plan is entitled VPN Guard Advanced features, e.g. ads-blocking.
How to setup a DNSonly VPN?
It is simple to setup a DNSonly VPN.
New server
Firstly, you could add a new DNSonly server. Just go to my.onemole.net using your browser. You'll find an Add DNSonly server button at the bottom of the page.
Installation
Next, you'll need to install Wireguard VPN app, which is an open source VPN software designed for next-generation VPN connections. You can find the download link here, or via the app store for your mobile devices.
Setup
Once your DNSonly VPN server is ready, you can login to my.onemole.net from your browser, and click on Setup VPN button next to the address of the DNSonly VPN server that you want to setup.
Click on the Show button under VPN configuration section. A QR code would soon appear, allowing you to scan with the Wireguard VPN app on your mobile device. You would also be provided a link to download a configuration file and import it into the Wireguard VPN app on your desktop.
The Wireguard VPN app would now show a new VPN profile added.
You could check the detailed configuration of the new VPN profile, and make sure the DNS servers setting (shown in the first highlighted part in the image below) is set to:
10.0.10.0,1.1.1.1,fddd::1010,2606:4700:4700::1111
Take note that 1.1.1.1 and 2606:4700:4700::1111 are the public DNS addresses provided by Cloudflare.com, and they do not block any malware or ads. They are included as fallback options, and you may remove them or change them to any other public DNS.
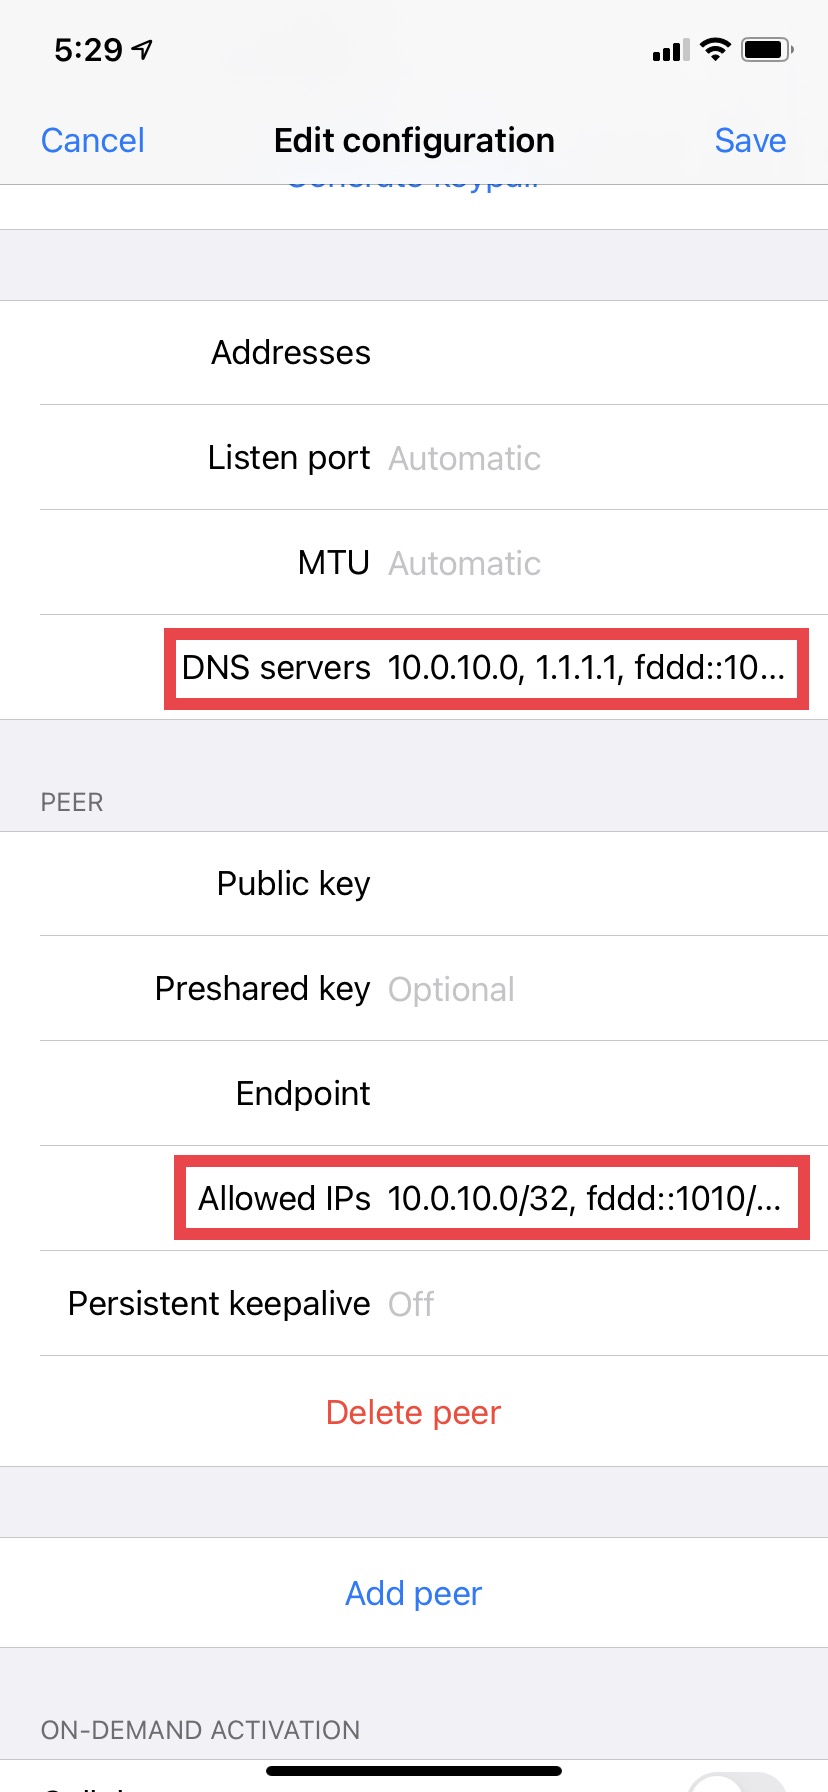
It is very important to ask the Wireguard VPN app to ignore traffic between your device and the Internet. Hence only DNS queries should be sent via the DNSonly VPN server.
In order to do that, the Allowed IPs setting in the Wireguard VPN app (shown in the second highlighted part in the image above) must be set to:
10.0.10.0/32,fddd::1010/128
Failing to do so would make the Internet inaccessible.
How to setup a regular personal VPN as a DNSonly VPN?
Please take note that only regular personal VPN under VPN Plus plan is entitled VPN Guard Advanced features, e.g. ads-blocking.
In order to setup a regular personal VPN as a DNSonly VPN, you need to use Wireguard as the connection type.
You can login to my.onemole.net from your browser, and click on Setup VPN button next to the address of the VPN server that you want to setup.
This time, under VPN configuration section, choose Wireguard. A popup would be seen, and you need to click on the Show button to obtain the QR code.
Scan the QR code using the Wireguard VPN app on your mobile device, or download and import the configuration file into the Wireguard VPN app on your desktop. Your Wireguard VPN app now has a new VPN profile added.
However, it's important that you make certain changes in the detailed configuration of the VPN profile.
You'll need to follow the instructions above, and change the DNS servers setting to:
10.0.10.0,1.1.1.1,fddd::1010,2606:4700:4700::1111
The Allowed IPs setting in the Wireguard VPN app must be set to:
10.0.10.0/32,fddd::1010/128
Your regular personal VPN can now serve as a DNSonly server and all traffic to and from the Internet would bypass the VPN server.